Live recording with Cubase – capture your concerts
Setting up your DAW for an optimized workflow
Like other manufacturers Steinberg has developed a tailor-made solution for computer-assisted live recording: “Nuendo Live”. The software often proved its flawless service but not every musician is willing to invest in a new software, especially when already owning Cubase. This tutorial shows you how to setup your DAW for a live recording with Cubase.
1. free up resources
Especially in a live scenario it is important to increase system stability of your computer to a maximum. Therefore it makes sense to ban processes that have nothing to do with the recording session. Background services such as Skype, Dropbox, anti-virus programs or even the screen saver are not needed in such situations. A look into the task manager also exposes unnecessary processes. Don’t forget to disable Wi-Fi and Bluetooth.

2. set the right buffer size
In contrast to a studio recording the musicians on stage will not follow a playback – at least not from the recording system. Thus the topic “latency” plays no role. To increase performance you can set the buffer size of your audio driver to the highest possible value, for example to 1024 or 2048 samples.
3. check your data volume and data rate
When recording many live sources at once the required storage space increases rapidly. For example a concert with 24 tracks will generate about 12 GB per hour at a sample rate of 48 kHz and 24 bit word length.
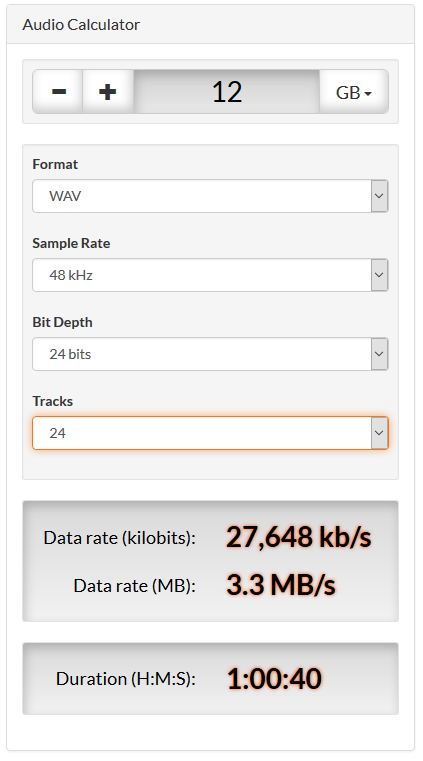
The web site of SoundDevices offers a nice tool which can be used to calculate the data volume. Based on the data rate, measured in “kB / second”, it is possible to determine the needed space of your hard disk.
The same principle applies to the audio interface and the bus via which it is connected to the computer. This topic would be a tutorial of its own. A USB3.0 interface is more than sufficient, since its transfer speed by far exceeds the bottle neck of a FireWire interface, which was still considered standard in computer-supported recording a few years ago.
4. project setup in Cubase
When you start Cubase you should create a dedicated folder only for capturing audio – if possible not on the system drive.
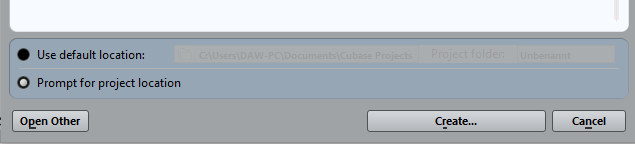
You can define a dedicated folder for the live recording with Cubase.
By pushing [Shift] + [S] the “project setup” will open. It is recommended to provide the project with a sufficient “length“, for example “2: 00: 00: 00” to record a live concert with a duration up to two hours.
It’s very useful to switch the timeline from “bars+beats” to “seconds” or “timecode” by selecting the preferred “display format”.
Also the file format selected under “recorded file type” is very important. “AIFF “supports a maximum file size of 2 GB, the” WAV “format already 4 GB.
A further development of WAV would be the so-called “Broadcast Wave Format” (BWF). This format also can store metadata such as timecode position, sound engineer or artist. Very useful when doing a live recording with Cubase for a lot of bands!
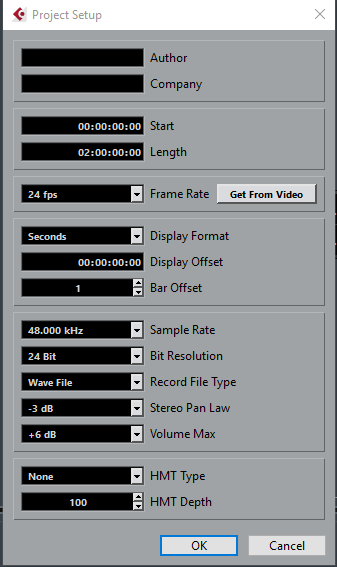
Important parameters like sample rate or file format can be found in the project setup.
Finally, check the sample rate at which the audio files will be written. This value strongly depends on whether you get the single signals from an analog mixer and thus have free choice over the sample rate. If the audio interface is directly connected (or via MADI or ADAT) to a digital console which often outputs 48 kHz and 24 bits an immediate sample rate conversion could be avoided. Also any problems regarding wordclock synchronization can be reduced.
5. I/O setup
Once the driver for the audio interface is selected in Cubase you can create the corresponding inputs and outputs in the “VST connections” dialog after pushing [F4].
It is useful to first delete all existing connections such as “Stereo Bus 1” and then create the desired number of inputs and outputs all at once.
The button “add bus” opens a window that manages the number of channels, their configuration (in this case “mono”) and the naming. If you enter the amount of channels in the first field, for example “56”, and in the last field “mono in”, the naming of the new inputs is done automatically and very quick.
If the individual tracks are to be output on the same channels (e.g. for a virtual sound check) you can repeat this process in the “outputs” tab.
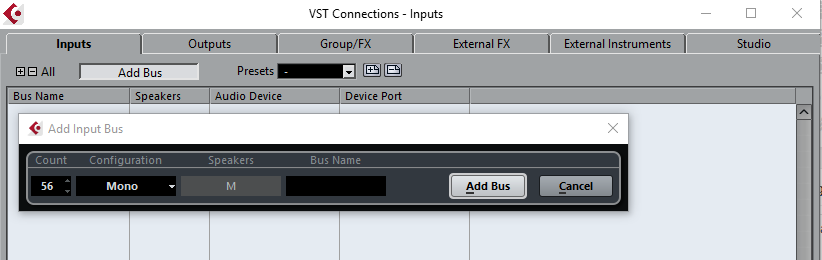
„VST connections“: all physical inputs and outputs of your audio interfaces can be routed to mono busses.
6. routing
The higher the number of channels the more time-consuming is the routing. But a small trick helps.
In the arrangement window, right-click the track header to execute the “add audio track” command. The same amount of channels (e.g. “56”) and the same configuration (“mono”) are selected again in the dialog.
If you now click on the first and last of the freshly created tracks while holding the [Shift] key all tracks are selected.
After that, press and hold the [Shift] key again while selecting “mono in 1” in the input routing of the first track. The routing panel can be found either in the MixConsole or in the Inspector. Cubase automatically assigns the remaining tracks to the corresponding inputs – with ascending channel number! This also works for the output routing.
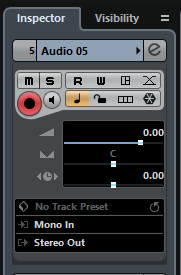
You can change the input and outputs routing in the Inspector as well as in the MixConsole.
7. customize your arrangement window
Check out the following steps for a better overview in the arrangement window.
A marker track makes the navigation in the project easier. Add one with a simple right-click on the track header. During recording, you could insert a marker “on-the-fly” with the [Ctrl] + [1] to [9] keystrokes before each song. After the recording you can jump to the markers up with [Shift] and the corresponding number.
In the “Devices” menu, the “Time display” function even shows a separate window, which is easier to read from larger distances. In the same menu the function “Record Time Max” is available, which opens a similar window for this important information.
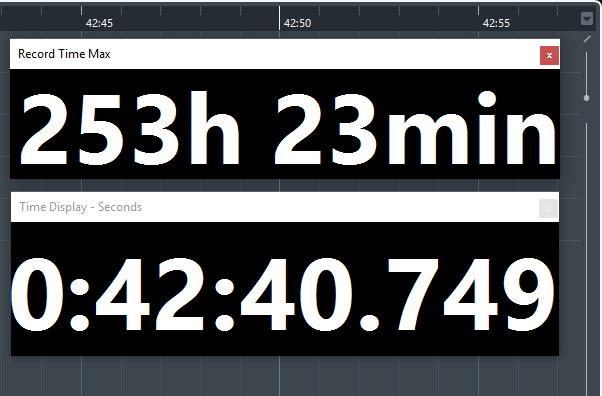
“Record Time Max” and “Time Display” as big, separate windows.
8. create a folder track for quicker workflow
Right-click the track header and create a new folder track. If you drag&drop all tracks in the folder track it’s easy to activate/deactivate the record arm or the input monitoring with the corresponding buttons of the folder track.
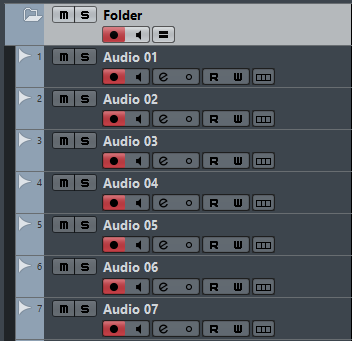
A folder track helps with the handling of many input channels.
9. customize the MixConsole – use it as a meter bridge
Since Steinberg introduced its “MixConsole” in Cubase 7 you have the option to hide all insert slots, effect sends, etc. using the drop-down menu “Racks“. This way you can create a mixer view which only shows the input channels and the dedicated metering. This provides a very good overview of the levels and possible peaks with larger scaled channel faders.
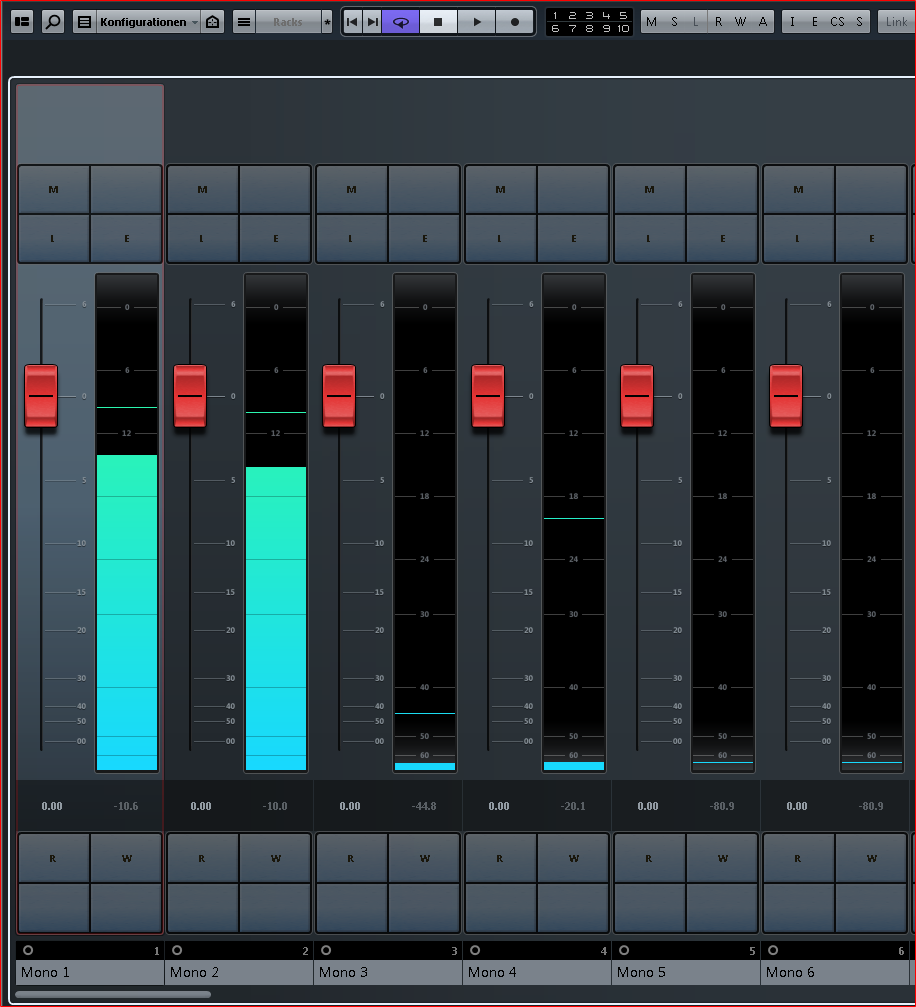
All unnecessary racks were hidden in MixConsole. Only the big meters of the faders visualize the input levels.
The red input faders regulate the level to the audio track. But keep in mind: they do not save you from clipping at the audio interface if the incoming signal is too high. For this reason you should move the “Meter Position” from “Post-Panner” to “Input” with a right-click.
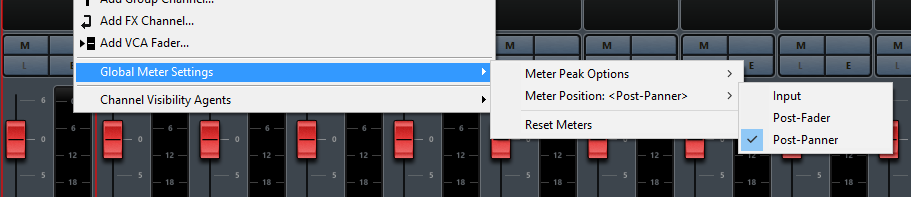 After a right-click on the fader you can change the “Meter Position”.
10. preferences
Let’s dig a little bit deeper! In the menu “file / preferences” listed under “recording / audio”, even more practical commands are hidden.
The first is “Àudio Pre-Record Seconds“. A maximum value of 60 seconds is possible here. If this function is active, Cubase always stores the audio material in the buffer. If the recording has been started too late, the audio events can be trimmed on the lower left side and the missed performance shows up. You should not necessarily use the maximum value which in turn eats up system resources.
Cubase saves the recording in RF64 format, “When Recording Wave Files larger than 4GB“. However, since this format can lead to compatibility limitations, you should decide whether to use the other option “divide files” in extremely long recordings.
“Create Audio Images During Record” is another performance-related feature. When activated Cubase calculates the waveforms of the audio events during recording which allows for good visual control. Only if the CPU power of the system can not handle it you should remove this check mark.
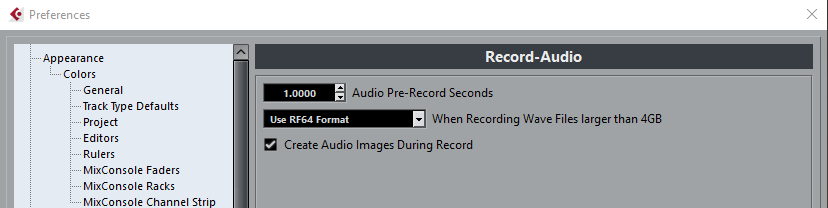
Check your preferences! „pre-record“ and„create audio images“ are important aspects during a live recording with Cubase.
11. double check your key commands
For good reasons the specialist “Nuendo Live” implemented important protection functions to ignore accidental slips on the computer keyboard. In Cubase you can also take care of these dangerous controls:
On the one hand, the [space] key, which also performs the stop command next to the playback start, and the [num *] key, which starts and stops the recording. Furthermore, the [R] key requires special attention because it activates and deactivates the record arm of selected tracks – even during operation!
Therefore, if you do not want to interrupt your recording you should find the appropriate shortcuts in the “file / key commands” menu and delete them completely. For studio sessions and live recording with Cubase it is recommended to create a separate preset.
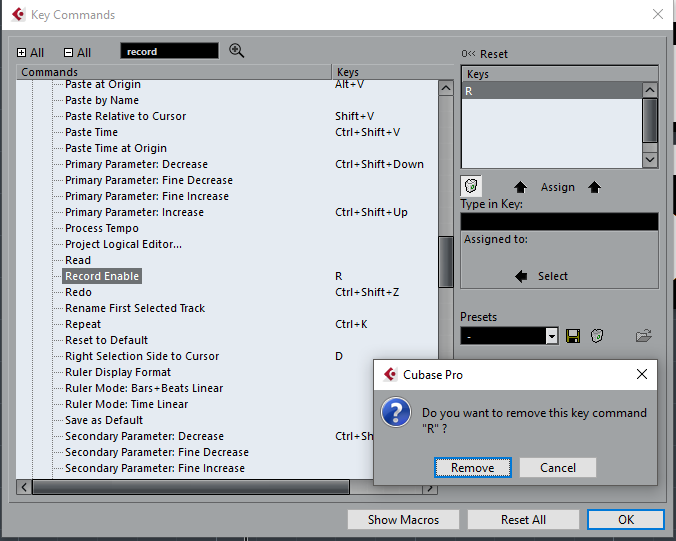
To make your setup more secure delete some of the key commands which accidentally could interrupt the recording process.
Conclusion
It’s a bit of work to get prepared for a live recording with Cubase. But the good thing is – once it’s done you can save it as a template. Before putting Cubase into action during a live show you should perform a few tests. Set up your desired amount of tracks and add 10 more tracks just to let your system crunch the numbers for a couple of hours.
More information and alternative DAWs for live recording:
Steinberg Nuendo Live (350 $)
Waves Tracks Live (99 $)
Cockos Reaper (60 $)
Presonus StudioOne Prime (free)